One of my favorite features coming in Windows 8.1 for developers has got to be the ability to render a selected piece of UI to an image and allowing for further manipulation with that image (changing pixels and ultimately saving it to some permanent storage location). We have this in WPF, Silverlight and Windows Phone. And now it’s coming to Windows Store apps as well. Specifically, it’s the RenderTargetBitmap class that makes this possible.
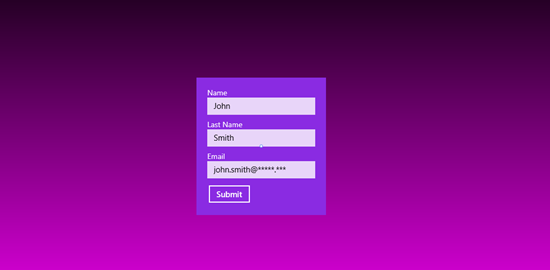
Take for example, this piece of UI:

Let’s say I don’t want to send this user data in a text form, but rather send an image of the filled-out form, for a change. And I want to include the violet part only, to get just the form, pure. You know, get rid of the gradient...
So I would take the Grid element that’s topmost in XAML tree I want to capture, and name it “TheForm”.
On button click, I’d let the user pick a file location, then invoke three magical lines:
var renderTargetBitmap = new RenderTargetBitmap();
await renderTargetBitmap.RenderAsync(TheForm);
var pixelBuffer = await renderTargetBitmap.GetPixelsAsync();
Where in fact the second line is the one actually doing the hard work of capturing the snapshot… So simple!
The rest of the code I have is just about picking the right encoder and actually pushing the bytes to the file:
using (var stream = await file.OpenAsync(FileAccessMode.ReadWrite))
{
    var encoder = await BitmapEncoder.CreateAsync(BitmapEncoder.JpegEncoderId, stream);
    encoder.SetPixelData(
        BitmapPixelFormat.Bgra8,
        BitmapAlphaMode.Ignore,
        (uint)renderTargetBitmap.PixelWidth,
        (uint)renderTargetBitmap.PixelHeight,
        logicalDpi,
        logicalDpi,
        pixelBuffer.ToArray());

    await encoder.FlushAsync();
}
But wait, there’s more!
The RenderTargetBitmap class is actually a subclass of ImageSource, which means you can set it to any property accepting the same type without having to worry about encoders or moving bytes around.
In the following example, I’m going to create a fake form entry sniffer that would take a snapshot of the form once on every two user keystrokes.
Instead of secretly sending snapped image to a secret location through a secret channel, I’ll simply add an Image control next to TheForm and make it a little bigger, say twice the width of the original form. I named it MirorImage.
In Page’s constructor, I’ll initialize a new instance of RenderTargetBitmap and set it as MirrorImage’s source:
mirrorRenderTargetBitmap = new RenderTargetBitmap();
MirrorImage.Source = mirrorRenderTargetBitmap;
With that done, I only have to worry about picking the right time to capture the form. I said I’d capture once every two keystrokes, so:
private async void TextBox_TextChanged(object sender, TextChangedEventArgs e)
{
    if (mustRender)
    {
        await mirrorRenderTargetBitmap.RenderAsync(TheForm);
    }
    mustRender = !mustRender;
}
(every TextBox on TheForm is of course wired to the TextBox_TextChanged event handler)
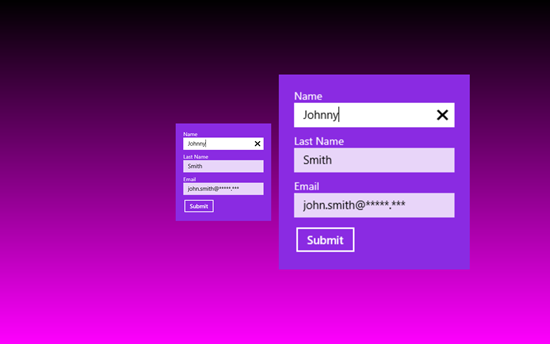
And the result:

The form on the right is just a rendered image of the original “TheForm” from the left. And although I’ve set the Image’s width to be twice the one of “TheForm” (while not specifically setting the height), the image is rendered correctly and proportionally. Note that you can also set the target image size manually when invoking the RenderAsync method – its overload is accepting width and height parameters.
These are only a couple of very basic examples of RenderTargetBItmap class usages, there are numerous cases where this is going to come in handy, I’m sure. This feature will be included in forthcoming Windows 8.1 update and will not work on current Windows 8 version.
Here’s a downloadable source code for this example. You’ll Visual Studio 2013 (Preview) and Windows 8.1 to open and run the project.
7a8d8b03-7a3e-422d-a17a-b70c4a07bc23|4|3.8|27604f05-86ad-47ef-9e05-950bb762570c