Andrej Tozon's blog

In the Attic

NAVIGATION - SEARCH

Highlighting search results within Windows Store apps

Download source code

Guidelines and checklist for search page for Windows Store apps (formerly Metro) suggest using hit highlighting to “indicate why a search result matches the [search] query”, as displayed on this screenshot (taken from the linked page):

That’s a great way to show the user why results are returned from the search query, but how do you implement that?

I already hinted at the suggested approach in my previous post, where I wrote about bindable Runs. Using the same technique, the hit highlighting guideline can be implemented pretty easily.

Let’s see how.

I’ve started out with a default Windows Store Grid app template, which provides the conveniently built-in sample data source. That’s the source we’re going to search through.

image

Of course we’ll need to implement the Search contract: Project –> Add New Item –> Search Contract. That will add the search results page to the project and put search activation code snippet into the App class.

image

The details for searching through the sample data source is yours to implement(a sample is included in provided source code).

Now for the relevant part.

The trick is to create a binding service that would take 3 input parameters:

1. Full text that contains the highlighted part,
2. Search text,
3. (Optional) highlight brush.

The service would extend the TextBlock control by clearing all its inlines and replacing them with a new set of Runs that will compose the new, highlighted text.

I’ve created a service that exposes these three parameters as dependency properties, this is the relevant code that executes when either full or highlighted text changes (find full implementation in the provided source code):

private static void OnTextChangedCallback(DependencyObject d, DependencyPropertyChangedEventArgs e)
{
    TextBlock textBlock = d as TextBlock;
    if (textBlock == null)
    {
        return;
    }
    string fullText = GetFullText(textBlock);
    string highlightedText = GetHighlightedText(textBlock);

    if (string.IsNullOrEmpty(fullText) || highlightedText == null)
    {
        return;
    }

    Brush brush = GetHighlightBrush(textBlock) ?? new SolidColorBrush(Windows.UI.Colors.Red);

    highlightedText = highlightedText.Substring(1, highlightedText.Length - 2);

    int length = highlightedText.Length;
    int lastIndex = 0;
    int index = fullText.IndexOf(highlightedText, 0, StringComparison.CurrentCultureIgnoreCase);

    textBlock.Inlines.Clear();
    while (index >= 0)
    {
        textBlock.Inlines.Add(new Run { Text = fullText.Substring(lastIndex, index - lastIndex) });
        textBlock.Inlines.Add(new Run { Text = fullText.Substring(index, length), Foreground = brush });
        lastIndex = index + length;
        index = fullText.IndexOf(highlightedText, lastIndex, StringComparison.CurrentCultureIgnoreCase);
    }
    textBlock.Inlines.Add(new Run { Text = fullText.Substring(lastIndex) });
}

To use this binding service, open StandardStyles.xaml (found in the Common folder) and search for the StandardSmallIcon300x70ItemTemplate style. This style is used to display the items in the search results page. You’ll find three TextBlocks in there – one for Title, one for Subtitle and the last one displays the Description. Instead of binding to Text property, wire those TextBlocks to the new binding service:

<TextBlock ifs:BindingService.FullText="{Binding Title}" ifs:BindingService.HighlightedText="{Binding DataContext.QueryText, ElementName=resultsPanel}" ifs:BindingService.HighlightBrush="#d9001f" Style="{StaticResource BodyTextStyle}" TextWrapping="NoWrap"/>
<TextBlock ifs:BindingService.FullText="{Binding Subtitle}" ifs:BindingService.HighlightedText="{Binding DataContext.QueryText, ElementName=resultsPanel}" ifs:BindingService.HighlightBrush="#d9001f"  Style="{StaticResource BodyTextStyle}" Foreground="{StaticResource ApplicationSecondaryForegroundThemeBrush}" TextWrapping="NoWrap"/>
<TextBlock ifs:BindingService.FullText="{Binding Description}" ifs:BindingService.HighlightedText="{Binding DataContext.QueryText, ElementName=resultsPanel}" ifs:BindingService.HighlightBrush="#d9001f"  Style="{StaticResource BodyTextStyle}" Foreground="{StaticResource ApplicationSecondaryForegroundThemeBrush}" TextWrapping="NoWrap"/>

And you’re done Smile

image

Download source code

Windows Store apps: the case of missing StringFormat or Binding on the Run

If your previous developer experience include developing for other XAML technologies and you’re moving into the Windows Store apps space, you’ve already noticed that a lot of things you were used to in other techs, are missing from your Windows Store app development experience. One example being there’s no more StringFormat property available in your Binding markup construct. You may have been used to writing something like:

<TextBlock Text="{Binding Name, StringFormat='Name: \{0\}'}" />

(that would bind your TextBlock to the Name property, outputting “Name: [property value]” to the UI)

With StringFormat missing from WinRT’s XAML Binding, you have two options:

1. Create a StringFormat value converter and handle your string formatting there.

2. Break down your text into smaller chunks of text and bind those to the Runs, which are part of your TextBlock:

<TextBlock Style="{StaticResource BodyTextStyle}" TextWrapping="NoWrap">
  <Run Text="Name: " />
  <Run Text="{Binding Name}" Foreground="Red" />
</TextBlock>

Yes, Runs are bindable!

Not only will Runs inherit styling attributes from their parent TextBlock, you can override them in whole, or just parts of it (like changing color only, etc.) And you make your TextBlock “bind” to more than one property in one go, something not possible with StringFormat or converter workaround.

Pretty cool.

Variable-sized grid items in Windows 8 apps

This is a screenshot of the Windows 8 Store app:

image

And this is what you get when you start a new Windows 8 “Windows Store Grid App”:
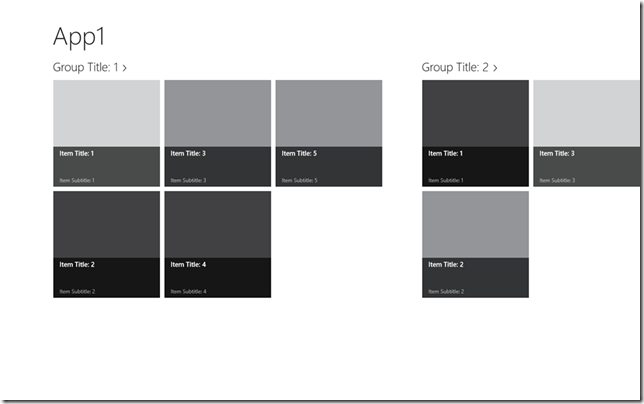
image_3

Wouldn’t it be great if you would be able to control the size of each particular item in your grid? To break out from dullness of having all items the same size, like, for example, to emphasize featured items; or for just any other reason?

Turns out you can do that (quite easily). I came about to this blog post describing one way to do it: “Windows 8 Beauty Tip: Using a VariableSizedWrapGrid in a GridView makes Grids Prettier” by Jerry Nixon. Reading it, I thought there had to be some easier way to do it than subclassing a GridView just for this.

And it turned out there was. Or at least it would be, if Windows 8 XAML supported Style Bindings like Silverlight 5. Not having that, the solution required that extra step that would allow binding to properties from within declared styles.

So what’s the idea?

Looking at GridView’s GroupStyle ItemsPanelTemplate after creating a new, default, Windows Store Grid App, it’s already set to VariableSizedWrapGrid – exactly what I needed. Now you just have to set its ItemWidth and ItemHeight properties to 250, and at the same time, remove those explicit sizes from the Standard250x250ItemTemplate (found in StandardStyles.Xaml). This puts GridView in control of sizing the GridViewItems.

The next step is adapting the model with extra two properties that will hold the horizontal and vertical spanning values. For this, you have to extend the provided SampleDataItem class with two new properties:

private int _horizontalSize = 1;
public int HorizontalSize
{
    get { return this._horizontalSize; }
    set { this.SetProperty(ref this._horizontalSize, value); }
}

private int _verticalSize = 1;
public int VerticalSize
{
    get { return this._verticalSize; }
    set { this.SetProperty(ref this._verticalSize, value); }
}

The default value for both is 1, which means, each item should occupy one unit of the grid only. HorizontalSize of 2 should span 2 columns, and VerticalSize of 2 should span 2 rows. Having both properties set to 2 would of course make the item occupy four units of the grid (2x2).

For this example, I only made the first item bigger.

If Windows 8 apps supported Binding from styles, I would easily finish this off by creating a new Style like:

<Style x:Key="VariableGridViewItemStyle" TargetType="GridViewItem">
  <Setter Property="VariableSizedWrapGrid.ColumnSpan" Value="{Binding HorizontalSize}" />
  <Setter Property="VariableSizedWrapGrid.RowSpan" Value="{Binding VerticalSize}" />
</Style>

… and set this style as GridView’s ItemContainerStyle.

Unfortunately, such binding is not yet supported, so I had to find some other way to do it.

Delay’s code to the rescue! It’s a complete (and short) solution that does exactly what I needed and it just works. I had to adapt it to suit WinRT and its new reflection model a bit, but at its core it stayed the same.

Here’s the adapted style that can bind to my properties through modified Delay’s helper:

<Style x:Key="VariableGridViewItemStyle" TargetType="GridViewItem">
    <Setter Property="local:SetterValueBindingHelper.PropertyBinding">
        <Setter.Value>
            <local:SetterValueBindingHelper>
                <local:SetterValueBindingHelper
                    Type="VariableSizedWrapGrid"
                    Property="ColumnSpan"
                    Binding="{Binding HorizontalSize}" />
                <local:SetterValueBindingHelper
                    Type="VariableSizedWrapGrid"
                    Property="RowSpan"
                    Binding="{Binding VerticalSize}" />
            </local:SetterValueBindingHelper>
        </Setter.Value>
    </Setter>
</Style>

After applying this change, the result can effectively be observed in Visual Studio 2012 (thanks XAML Editor Smile), and here’s how the app looks when running:
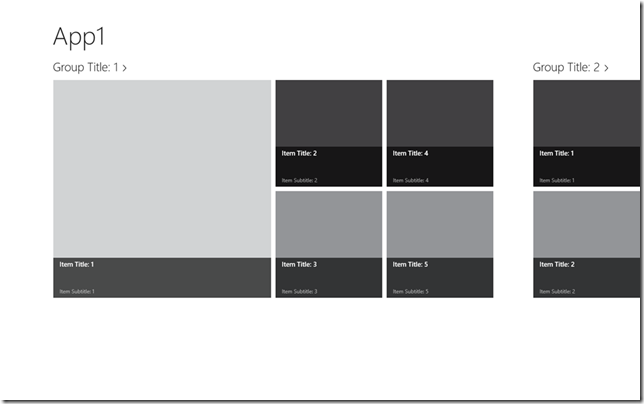
image_4

I like this approach because it’s XAML-only - it doesn’t force me to use a derived control and I can specify the sizing properties I want to bind to through my style resource. Which makes the solution a bit more flexible. The downside is of course this requirement of having a Style binding helper class, but I really really hope the Windows 8 gets this built in ASAP.

To close, here’s the modified version of Delay’s SetterValueBindingHelper (not really tested yet!):

public class SetterValueBindingHelper
{
    /// <summary>
    /// Optional type parameter used to specify the type of an attached
    /// DependencyProperty as an assembly-qualified name, full name, or
    /// short name.
    /// </summary>
    [SuppressMessage("Microsoft.Naming", "CA1721:PropertyNamesShouldNotMatchGetMethods",
        Justification = "Unambiguous in XAML.")]
    public string Type { get; set; }

    /// <summary>
    /// Property name for the normal/attached DependencyProperty on which
    /// to set the Binding.
    /// </summary>
    public string Property { get; set; }

    /// <summary>
    /// Binding to set on the specified property.
    /// </summary>
    public Binding Binding { get; set; }

    /// <summary>
    /// Collection of SetterValueBindingHelper instances to apply to the
    /// target element.
    /// </summary>
    /// <remarks>
    /// Used when multiple Bindings need to be applied to the same element.
    /// </remarks>
    public Collection<SetterValueBindingHelper> Values
    {
        get
        {
            // Defer creating collection until needed
            if (null == _values)
            {
                _values = new Collection<SetterValueBindingHelper>();
            }
            return _values;
        }
    }

    private Collection<SetterValueBindingHelper> _values;

    /// <summary>
    /// Gets the value of the PropertyBinding attached DependencyProperty.
    /// </summary>
    /// <param name="element">Element for which to get the property.</param>
    /// <returns>Value of PropertyBinding attached DependencyProperty.</returns>
    [SuppressMessage("Microsoft.Design", "CA1011:ConsiderPassingBaseTypesAsParameters",
        Justification = "SetBinding is only available on FrameworkElement.")]
    public static SetterValueBindingHelper GetPropertyBinding(FrameworkElement element)
    {
        if (null == element)
        {
            throw new ArgumentNullException("element");
        }
        return (SetterValueBindingHelper) element.GetValue(PropertyBindingProperty);
    }

    /// <summary>
    /// Sets the value of the PropertyBinding attached DependencyProperty.
    /// </summary>
    /// <param name="element">Element on which to set the property.</param>
    /// <param name="value">Value forPropertyBinding attached DependencyProperty.</param>
    [SuppressMessage("Microsoft.Design", "CA1011:ConsiderPassingBaseTypesAsParameters",
        Justification = "SetBinding is only available on FrameworkElement.")]
    public static void SetPropertyBinding(FrameworkElement element, SetterValueBindingHelper value)
    {
        if (null == element)
        {
            throw new ArgumentNullException("element");
        }
        element.SetValue(PropertyBindingProperty, value);
    }

    /// <summary>
    /// PropertyBinding attached DependencyProperty.
    /// </summary>
    public static readonly DependencyProperty PropertyBindingProperty =
        DependencyProperty.RegisterAttached(
            "PropertyBinding",
            typeof (SetterValueBindingHelper),
            typeof (SetterValueBindingHelper),
            new PropertyMetadata(null, OnPropertyBindingPropertyChanged));

    /// <summary>
    /// Change handler for the PropertyBinding attached DependencyProperty.
    /// </summary>
    /// <param name="d">Object on which the property was changed.</param>
    /// <param name="e">Property change arguments.</param>
    private static void OnPropertyBindingPropertyChanged(DependencyObject d, DependencyPropertyChangedEventArgs e)
    {
        // Get/validate parameters
        var element = (FrameworkElement) d;
        var item = (SetterValueBindingHelper) (e.NewValue);

        if ((null == item.Values) || (0 == item.Values.Count))
        {
            // No children; apply the relevant binding
            ApplyBinding(element, item);
        }
        else
        {
            // Apply the bindings of each child
            foreach (var child in item.Values)
            {
                if ((null != item.Property) || (null != item.Binding))
                {
                    throw new ArgumentException(
                        "A SetterValueBindingHelper with Values may not have its Property or Binding set.");
                }
                if (0 != child.Values.Count)
                {
                    throw new ArgumentException(
                        "Values of a SetterValueBindingHelper may not have Values themselves.");
                }
                ApplyBinding(element, child);
            }
        }
    }

    /// <summary>
    /// Applies the Binding represented by the SetterValueBindingHelper.
    /// </summary>
    /// <param name="element">Element to apply the Binding to.</param>
    /// <param name="item">SetterValueBindingHelper representing the Binding.</param>
    private static void ApplyBinding(FrameworkElement element, SetterValueBindingHelper item)
    {
        if ((null == item.Property) || (null == item.Binding))
        {
            throw new ArgumentException(
                "SetterValueBindingHelper's Property and Binding must both be set to non-null values.");
        }

        // Get the type on which to set the Binding
        Type type = null;
        TypeInfo typeInfo = null;
        if (null == item.Type)
        {
            // No type specified; setting for the specified element
            type = element.GetType();
            typeInfo = type.GetTypeInfo();
        }
        else
        {
            // Try to get the type from the type system
            type = System.Type.GetType(item.Type);
            if (null == type)
            {
                // Search for the type in the list of assemblies
                foreach (var assembly in AssembliesToSearch)
                {
                    // Match on short or full name
                    typeInfo = assembly.DefinedTypes
                        .Where(t => (t.FullName == item.Type) || (t.Name == item.Type))
                        .FirstOrDefault();
                    if (null != typeInfo)
                    {
                        // Found; done searching
                        break;
                    }
                }
                if (null == typeInfo)
                {
                    // Unable to find the requested type anywhere
                    throw new ArgumentException(string.Format(CultureInfo.CurrentCulture,
                                                              "Unable to access type \"{0}\". Try using an assembly qualified type name.",
                                                              item.Type));
                }
            }
            else
            {
                typeInfo = type.GetTypeInfo();
            }
        }
        
        // Get the DependencyProperty for which to set the Binding
        DependencyProperty property = null;
        var field = typeInfo.GetDeclaredProperty(item.Property + "Property"); // type.GetRuntimeField(item.Property + "Property");
        if (null != field)
        {
            property = field.GetValue(null) as DependencyProperty;
        }
        if (null == property)
        {
            // Unable to find the requsted property
            throw new ArgumentException(string.Format(CultureInfo.CurrentCulture,
                                                      "Unable to access DependencyProperty \"{0}\" on type \"{1}\".",
                                                      item.Property, type.Name));
        }

        // Set the specified Binding on the specified property
        element.SetBinding(property, item.Binding);
    }

    /// <summary>
    /// Returns a stream of assemblies to search for the provided type name.
    /// </summary>
    private static IEnumerable<Assembly> AssembliesToSearch
    {
        get
        {
            // Start with the System.Windows assembly (home of all core controls)
            yield return typeof(Control).GetTypeInfo().Assembly;
        }
    }
}

Debugging WinRT/XAML bindings

Visual Studio 2012 may not (yet?) support debugging of XAML bindings debugging in WinRT/Metro-style applications in a way we’re used to from programming WPF and Silverlight (a.k.a. XAML breakpoints), but basic notifications of failed bindings in the output window seems to be present and working.

Let’s look at the basic set up (new blank application).

MainPage.xaml – DataContext is set to the same page class to keep it simple;  TextBlock’s text is bound to a MyBinding property.

<Page
    x:Class="App1.MainPage"
    IsTabStop="false"
    xmlns="http://schemas.microsoft.com/winfx/2006/xaml/presentation"
    xmlns:x="http://schemas.microsoft.com/winfx/2006/xaml"
    xmlns:local="using:App1"
    xmlns:d="http://schemas.microsoft.com/expression/blend/2008"
    xmlns:mc="http://schemas.openxmlformats.org/markup-compatibility/2006"
    DataContext="{Binding RelativeSource={RelativeSource Self}}"
    mc:Ignorable="d">
    <Grid Background="{StaticResource ApplicationPageBackgroundThemeBrush}">
        <TextBlock Text="{Binding BindingText}" VerticalAlignment="Center" HorizontalAlignment="Center" />
    </Grid>
</Page>

MainPage.xaml.cs

public sealed partial class MainPage : Page
{
    public MainPage()
    {
        this.InitializeComponent();
    }

    public string BindingText { get { return "OK"; } }
}

BindingText property in the code-behind class that TextBlock is bound to, exposes a fixed string.

Running this project should greet you with the “OK” string  centered on the screen, meaning the binding worked as expected.

Changing the name of the binding property should break the binding.

public string BindText { get { return "OK"; } }

After starting now broken app, we’re greeted with an empty screen and no exceptions thrown. We can, however, observe a subtle notification about thee binding failure in the Output window:

Error: BindingExpression path error: 'BindingText' property not found on 'App1.MainPage'. BindingExpression: Path='BindingText' DataItem='App1.MainPage'; target element is 'Windows.UI.Xaml.Controls.TextBlock' (Name='null'); target property is 'Text' (type 'String')

Because such notifications are really easy to miss, there’s now a way to subscribe to binding errors notifications right from your WinRT code – Application’s DebugSettings property exposes a BindingFailed event you can subscribe to. This event will be called whenever binding fails (well, not exactly always , but whenever the binding failure message gets written to the Output window, you can be sure it will get called.

You can use this event to make sure that caught binding errors will surely get your attention, by i.e. displaying the exception message all over the place:

sealed partial class App : Application
{
    public App()
    {
        this.InitializeComponent();
        this.Suspending += OnSuspending;
        DebugSettings.BindingFailed += OnDebugSettingsOnBindingFailed;
    }

    private void OnDebugSettingsOnBindingFailed(object sender, BindingFailedEventArgs args)
    {
        new MessageDialog(args.Message).ShowAsync();
    }
    ...
}

image

Unfortunately, the binding failure message text is currently just the only thing you’re provided with in the event handler, but you can still parse it manually and decide whether you want it displayed or not.

Other BindingSettings options enable you to override the above-described behavior – setting IsBindingTrackingEnabled to false (it’s true by default) will disable failed binding notifications: the event will not get called and there will be no trace in the Output window.
Additionally, both kind of notifications only work when the debugger is attached. That means that running the application with Ctrl+F5 (Start Without Debugging) won’t display any notification either.

There is, however, one tiny difference between when notifications are presented – Output window will never write the exception message when running in the Release configuration, while the event will still get called.

To summarize: while we wait for a proper XAML debugging in WinRT, tracking the output window is the default option to catch binding failures. Subscribing to BindingSettingsBindingFailed event will give you some more flexibility and display visibility, and it also works when running in the Release configuration.


Announcing a new user group

Dear Slovenian developers and UI enthusiasts, mark your calendars for 8th of November 2011 as that’s the day we’re launching a new user group targeting the UI/UX professionals.

SIUX LogoSIUX – Slovenian UX User Group – a sister user group (or a Siamese twin group as we fondly call it Smile) of now years-running SLODUG, Slovenian Developers User Group (SLODUG), where we’ll focus on technologies and areas like WPF, Silverlight, HTML5, Kinect, Windows Phone, Windows 8; talk through their visual and interaction design aspects; explore user interface examples, usability and related factors.

SLODUG and SIUX will share their members and meeting place. As mentioned, the first, inaugural meeting, will take place on Tuesday, 8th of November 2011, starting at 17h. Two talks are scheduled for the meeting: Developing for XBox Kinect by Sašo Zagoranski and Metro: the UI of the future?  by me. The meeting will take place in Microsoft Lecture room at Šmartinska 140.

Full agenda:

17:00: Intro & announcements
17:15 – 18:00: Developing for XBox Kinect, Sašo Zagoranski / Semantika d.o.o.
18:15 – 19:00: Metro: UI of the future?, Andrej Tozon / ANT Andrej Tozon s.p.
19:00: Discussion over pizza &  beer

We’re also looking for speakers – if you’re interested or  know anybody from the field, please contact me and we’re schedule your talk in one of our next meetings.

Hope to see you!

Until then, you can follow us on Twitter or join our Facebook group.


Windows 8 Metro declarations: User Tile Provider

This blog post is part of my Windows 8 metro-style application declarations series. Read more about declarations in the introductory post about application manifest.

User Tile Provider declaration allows you to register your application as a user tile provider. That means that user will be able to use your application to change her user tile.

One of many ways of changing the user tile can is by clicking your personal tile (avatar) on Windows 8 Start screen – four options are currently displayed, one of them is “Change user tile”:

image

Selecting the first option will take you to Control Panel’s Personalize page, set on User Tile:

image

2 options for changing the tile already available: the user can browse through her pictures and select the one that she likes or she can take a new one with the help of her web cam.

Your own application as a user tile provider

As with other declarations, you declare your application as a user tile provider in the application manifest. The easiest way to do that is through the manifest editor. You’ll see that when you add the User Tile Provider declaration to the Supported Declarations list, there are no declaration specific options to be set.

image

That’s good. After setting the declaration, run or just deploy your application and return to the Control Panel. You should now be looking at something like this:

image

Your application is now registered as the official user tile provider and by clicking on the application tile it will be launched.

And fail.

Of course, there is some wiring you have to do in your code to make this work properly.

Wiring the application logic

There isn’t a special kind of activation reserved for this type of activation, it’s activated through the special Protocol activation - I covered Protocol activation before – if you set up Protocol activation as described in that blog post, you can check for specific protocol in the OnProtocolActivated handler; you’ll see that Uri, passed in through provided arguments, looks something like UserTileProvider://, so you just have to check for a particular protocol to see how or why your application was invoked:

private void OnProtocolActivated(ProtocolActivatedEventArgs args)
{
    if (args.Uri.Scheme == "usertileprovider")
    {
        PhotoView page = new PhotoView();
        page.SetProfileImage();
        Window.Current.Content = page;
        Window.Current.Activate();
        return;
    }

    // ... other protocol handlers
}

Here I’m bringing up a new PhotoView page (also discussed in my previous blog post) whenever my application is invoked for choosing a user tile.

Changing the user tile

OK, so application now responds to the user tile change call. But how do we actually change the tile? Well, there’s an API for that. You can get and set current user tile through asynchronous GetUserImageAsync() and SetUserImageAsync() methods of the UserInformation object.

In my demo application, I get the user tile from her profile, rotate it by 90° and display it to the user:

image

After user taps (selects) the image, she is first prompted for confirmation:

image

And if user confirms that (she can opt out by clicking somewhere outside of the dialog), the new image is set as her new user tile.

image

Quick tip: if you're using your Windows Live ID as your Windows 8 login, changing your user tile will change your general Windows Live display picture as well (in Windows Live Messenger, Live Profile, etc.)

The code for dealing with images is a bit messy – I got it working but I suspect this will get easier as we progress towards the final runtime bits:

Read the user tile, rotate it by 90° and set as the Image source:

public async void SetProfileImage()
{
    StorageFile file = UserInformation.GetUserImage(UserImageKind.LargeBitmap);
    BitmapDecoder decoder = await BitmapDecoder.CreateAsync(await file.OpenAsync(FileAccessMode.Read));
    BitmapTransform transform = new BitmapTransform();
    transform.Rotation = BitmapRotation.Clockwise90Degrees;
    PixelDataProvider pixelData = await decoder.GetPixelDataAsync(BitmapPixelFormat.Rgba8, decoder.BitmapAlphaMode, transform, ExifOrientationMode.RespectExifOrientation, ColorManagementMode.DoNotColorManage);
    WriteableBitmap bitmap = new WriteableBitmap((int)decoder.PixelWidth, (int)decoder.PixelHeight);
    pixelStream = bitmap.PixelBuffer.AsStream();
    pixelStream.Seek(0, SeekOrigin.Begin);
    pixelBuffer = pixelData.DetachPixelData();
    pixelStream.Write(pixelBuffer, 0, (int)pixelStream.Length);
    bitmap.Invalidate();

    Viewer.Source = bitmap;
}

Get the image from Image source, save it to a temporary file, set the user tile and delete the temporary file:

private async void SetUserTile()
{
    WriteableBitmap bitmap = Viewer.Source as WriteableBitmap;

    StorageFile file = await Windows.Storage.ApplicationData.Current.TemporaryFolder.CreateFileAsync("temp");
    BitmapEncoder encoder = await BitmapEncoder.CreateAsync(BitmapEncoder.PngEncoderId, await file.OpenAsync(FileAccessMode.ReadWrite));
    encoder.SetPixelData(BitmapPixelFormat.Rgba8, BitmapAlphaMode.Straight, (uint)bitmap.PixelWidth, (uint)bitmap.PixelHeight, 72.0, 72.0, pixelBuffer);
    await encoder.FlushAsync();
    await Windows.System.UserProfile.UserInformation.SetUserImageAsync(file);
    await file.DeleteAsync();
}

Noticed a lot of asynchronous / await calls? Plenty of those in WinRT Winking smile

There’s still many quirks and missing bits around the User Tile Provider declaration implementation, it’s obviously not complete yet. But the ability to provide users with your own application to change their user tiles just feels overwhelming. I bet we’ll get some pretty creative applications in this space when Windows 8 marketplace ships.


Windows 8 Metro declarations: File Type Associations

This blog post is part of my Windows 8 metro-style application declarations series. Read more about declarations in the introductory post about application manifest.

File Type Associations Declaration is very similar to Protocol Declaration. Similar in a way that it defines an OS-wide declaration that’s used to launch your application. What this declaration does should be familiar to most Windows users as it’s been a part of the system from the very beginning.

Every file extension can be associated with a particular application that can handle the content of such file. Most text editors, for example, know how to handle files with .txt extension , file formats like .jpg, .png, and .bmp, are handled by graphics applications like Paint or PhotoShop, etc.

File Type Associations Declaration lets you declare specific file extension(s) that your application will be able to handle. It can be an existing, well-known extension such as .txt, or you can come up with your very own extension and/or file format and register that. For this example, I’ll declare two extensions – .jpg (well-known graphics format extension, and .jpgx – a made up extension that will serve just as an example for this blog post) - my sample application will display the same photo viewer for both extensions.

Setting up the photo viewer page

I’ve created a new blank page in my application and put the Image control on it. That’ll serve as my simple photo viewer.

I’ve also added a method that will help me set the image. The method takes a parameter of type StorageFile, which is a new class in windows runtime that takes care of wrapping file info and does basic file manipulation.

public async void SetPhoto(StorageFile storageFile)
{
    BitmapImage image = new BitmapImage();
    IRandomAccessStream stream = await storageFile.OpenAsync(FileAccessMode.Read);
    image.SetSource(stream);
    Viewer.Source = image;
}

The above snippet shows a very basic way to asynchronously open a file. The stream is set as an image source after the file contents are fully read.

Application activation

Similar to Protocol example from my last post, the application is notified when user launches a file with associated extension, but the API behaves a bit differently here. The OnProtocolActivated method is already built into the Application class and you only have to override it in App class derivate to handle the activation. This behavior is most likely to change in one of the future versions of WinRT, but I currently have no idea whether we’ll get a separate method (OnXXXActivated) for each activation kind, or will there be a single method OnActivated, that will provide the activation kind through one of its parameters. Currently, there’s a weird mixture of both approaches.

Here’s how the overridden OnFileActivated method looks like:

protected override void OnFileActivated(FileActivatedEventArgs args)
{
    PhotoView page = new PhotoView();
    page.SetPhoto(args.Files[0] as StorageFile);
    Window.Current.Content = page;
    Window.Current.Activate();
}

Interesting things to note about the provided FileActivatedEventArgs class are:

  • args.Files contains a collection of files that were used in activation. In this example, I’m only using the first one.
  • args.PreviousExecutionState will tell you the state the application was in before activation. It can be either NotRunning, Running, Suspended and Terminated.
  • args.Verb is the action that was used for activating the app. Should be set to Open.

And that’s it for the code. The last thing is setting up the Declaration in the application manifest.

Application Manifest

image

This is the first part of the File Type Association Declaration Page. DisplayName is a localizable string that will be displayed to the user as associated file a handler and the graphics can be changed by specifying a new Logo. Info Tip should contain the text that will be displayed in a tooltip when user hovers a mouse over the application’s associated file extension. Name is a unique name of the association.

Edit Flags specify what type of security prompt will be displayed to the user when she launches the associated file. OpenIsSafe will show a standard warning dialog, while AlwaysUnsafe will display a security warning dialog.

 image

The second part of the Declaration configuration lets you set the supported file types. You can add as many file extensions as you want your application to handle and you can specify an optional content type for each of them. In the above example, extensions .jpg and .jpgx are registered.

Application Settings section lets you configure application’s entry point settings.

Running the application

Run (or just deploy) your application, then launch a .jpg file of your choice that’s on your disk. The following dialog should appear, asking you to select the default application that will handle that file extension in the future:

image

After selecting your app as the default, it should be launched (or activated if already running) and display the image.

Renaming a .jpg file to (previously unassociated extension) .jpgx and launching that, for example, will give you the following dialog:

image

You can check (and change) the default application for each of the file extensions through the Control Panel. Both .jpg and .jpgx are associated with my demo application:

image

Congratulations, you’ve just created your first file extension handling Metro application Smile


Windows 8 Metro declarations: Protocol

I touched on the Metro-style application declarations in my previous blog entry where I wrote about application manifest. I’m continuing the series with exploring the currently available declarations, starting with Protocol. I’ll be using C# Windows Metro style application samples throughout the whole series.

I imagined an application that would respond to the specific URL requests. Let’s say that invoking a URL like “locx://aerial/47.639747~-122.129731” should show me an aerial map, centered to a geographical point of (47.639747, -122.129731).

Displaying a Map

Let’s first figure out how to display the map. There isn’t any native WinRT maps component yet, so the simplest way to display a map is using Bing maps in a WebView Xaml control. WebView is a control that can display HTML, either passed in by string or by navigating to actual web site. Think of it as a very lightweight WebBrowser control, without all the chrome and other clutter.

So I put a WebView control on the MainPage, made sure it fills the whole page and altered its default constructor a bit:

public MainPage()
{
    InitializeComponent();
    WebView.Navigate(new Uri("http://www.bing.com/maps"));
}

Run the application – it should display a nice map of the world. If you have a touch screen, try manipulating the map with your fingers – it' feels nice Winking smile

Metro-style application can be configured to handle any URL protocol

Back to the subject. Open the application manifest configuration screen and navigate to the Declarations tab. Open the Available Declarations dropdown and select Protocol. The protocol will be added to Supported Declarations list box when you click the Add button.

image

Handling declaration properties for Protocol is pretty simple. You’re only required to name the protocol you want your application to handle. For this example, I’m using “locx”.

An optional custom graphics can be used as an application icon whenever the protocol declaration association needs to be displayed to the user (e.g. Control Panel). If not set, application’s Logo image will be used.

Once configured, open App.xaml.cs and override the OnActivated method. This method will get called whenever application is activated. Because an application can be activated for the various reasons, you have to check against the passed arguments for the specific activation kind.

protected override void OnActivated(IActivatedEventArgs args)
{
    if (args.Kind == ActivationKind.Protocol)
    {
        OnProtocolActivated((ProtocolActivatedEventArgs)args);
    }
}

When application is Protocol-activated, the activation arguments should be of the ProtocolActivatedEventArgs type and it should be safe to cast to that. I’ve created the OnProtocolActivated method to handle those cases separately. Note that some other activation scenarios have their equivalent activation methods already built in.

In the OnProtocolActivated method, you’ll have to resolve the Uri that was used for activation. I declared the following Uri format: locx://[view]/[latitude]~[longitude], where view is either roads or aerial. Here’s the method that parses the Uri and calls a specific constructor of the MainPage. That latitude and longitude should be provided using the currently set culture format (commas vs. dots) so they could be parsed into doubles.

private void OnProtocolActivated(ProtocolActivatedEventArgs args)
{
    string type = args.Uri.Host;
    double lat;
    double lng;

    string[] latlng = args.Uri.LocalPath.Substring(1).Split(new[] { "~" }, StringSplitOptions.RemoveEmptyEntries);

    if (latlng.Length != 2 || !double.TryParse(latlng[0], out lat) || !double.TryParse(latlng[1], out lng))
    {
        Exit();
        return;
    }

    Window.Current.Content = new MainPage(type, lat, lng);
    Window.Current.Activate();
}

In overridden MainPage constructor, a Bing maps query is composed and navigated to. Invariant culture is used to convert latitude and longitude to the proper format.

public MainPage(string type, double lat, double lng)
{
    InitializeComponent();
    string uri = string.Format("http://www.bing.com/maps/default.aspx?cp={0}~{1}&lvl=10&style={2}", lat.ToString(CultureInfo.InvariantCulture), lng.ToString(CultureInfo.InvariantCulture), type.ToLower()[0]);
    WebView.Navigate(new Uri(uri));
}

Activation Registration

A very positive thing about activating declarations is that protocol registration will be done when you deploy the application to your computer. That means you don’t need to run the application (as in – the first time) to register the protocol. You can even choose that your application will only support activation and do nothing when launched the ordinary way.

After deploying, you can test your application by invoking the following link from the command line (or Run prompt):

image

image

Of course application will handle any subsequent protocol requests while it’s already running too.

Metro-style application declarations promise a simple integration with the OS through predefined contracts, Protocol is just one of those extensibility points. I’ll look into others in my next posts.


Windows 8 Metro-style application manifest

When you create a new Windows Metro style application, Visual Studio will automatically create the application manifest for you. The file will be called Package.appxmanifest and will be included in the root of the project. Looking at it closer reveals that it’s a plain XML file that can be generated manually or with the help of some other tool as well.

Visual Studio, however, offers a nice GUI editor for editing the application manifest file. This is a quick walk through its tab pages. To invoke the editor, simply double-click on the manifest file or choose Store | Edit App Manifest from the menu.

Application UI

image

The tab for application menu hosts the basic info about your application.

Display Name is the title of your application. It will appear on the start screen, search page, etc., wherever the user can see. It can be localized.

Entry Point should point to the application’s activatable class id. It should be set to project’s App class, but in current build of Visual Studio, changing it to invalid value doesn’t currently seem to affect anything.

Description contains a longer description of your application, but it shouldn’t exceed 2048 characters. It can be localized as well.

Tiles (Logo, Wide Logo and Small Logo) represent the graphics you want to present your application with. The logo is also used as the main tile and the Small Logo is used for lists, etc. The Wide Logo is used when the app requires the wide format tile. Valid format for all graphics are .png and .jpg.

Further down, there are even more options…

image

Show Name and Short Name work in together with the above Display Name. Setting Show Name to Yes and leaving Short Name empty, the Display Name will be displayed on the application tile as an overlay. Set Short name to a custom name and Short Name will be displayed as the overlay.

Foreground Text sets the color of the text displayed on the application tile. In can be set to Light or Dark, for  best fit with the tile graphics.

Background Color specifies the tile’s background color. Can be either named or the ‘#’ color.

Notifications control how the notifications look and work.

Badge Logo points to the graphics that will be displayed on the lock screen as a notification from your application.

Lock Screen Notifications specify what kind of notifications your application will support when the system is locked. Can be set to Tile Text, Badge or both.

Toast Capable should be set to true when you want to send alerts from your application.

Splash Screen options (Splash Screen and Background Color) control the appearance of the splash screen. Splash Screen should point to the splash screen graphics and Background Color specifies the background color for that screen (transparency effects).

Initial Rotation specifies the initial rotation when the application starts. Can be set to all four possible rotations (Portrait, Landscape, Portrait and Flipped, Landscape and Flipped.

Capabilities

The next tab in application manifest editor allows you to set the protected resources you want to allow your application to access. Your application will not have the access to those capabilities if you don’t explicitly set them here, nor they won’t be accessible in cases when hardware does not support it, are blocked through other security policies, or when explicitly denied access by the user herself. Note that the user is prompted about those capability requirements when she is installing your application and can deny those requests. Even later…

Here’s the current list of those capabilities:

image

Declarations

Declarations are your application’s extensibility points, for better integration with the system and/or other installed applications. Some of those extensibility points include:

  • Contact Picker (your application serves as a contact picker for other applications),
  • File Type Associations (registers your app as a (default) handler for a specific file type),
  • File Picker (your app serves as a content picker for other apps; think choosers in Windows Phone),
  • Protocol (your app registers as a URL Protocol handler),
  • Search (provides searching functionality),
  • ShareTarget (for your next social networking application Smile),

… and a few more. All declarations have their own options and settings.

image

Packaging

The Packaging tab holds the info, relevant to deploying and publishing your application.

image

Package Name uniquely identifies the package and therefore your application too. It’s a GUID.

Package Display Name is a localizable package title that is displayed to the users.

Logo points to the application store logo.

Publisher describes the application publisher and matches the publisher subject information from the certificate that is used for signing the application manifest. The value is set automatically when choosing an existing certificate or create a new test certificate.

Publisher Display Name and Package Family Name are also derived from the chosen certificate. Publisher Display Name can be changed and even localized.


Windows 8 applications and JSON data

For anyone that wants to call various JSON data service endpoints in a Windows 8 (Metro style?) application, there’s a couple of changes in “.NET APIs for Metro style apps” (using MSDN terminology here) that needs to be looked into. For this blog post I’m using flickr API as an example of how to fetch and parse JSON data.

Where’s my WebClient?

No, there is no WebClient class in the new API. But…

There’s a HttpClient class that works similar, or even better, by providing an asynchronous method to fetch data. If you’ve looked into the Async CTP bits, the new method should look very familiar.

The new HttpClient class itself resides into the System.Net.Http namespace. Jumping right into the code:

public async Task<string> GetPhotosStream()
{
    HttpClient client = new HttpClient();
    string url = "http://www.flickr.com/services/rest/?method=flickr.photos.search&format=json&nojsoncallback=1&api_key=<yourkey>&text=buildwindows";
    HttpResponseMessage response = await client.GetAsync(url);
    return response.Content.ReadAsString();
}

Shall anyone need it, there is also a synchronous method called Get() that will block until full response message is returned and read on the client.

Other than Get(Async), there are three method pairs more – Get(Async), together with Put(Async), Post(Async) and Delete(Async) forms the full set of verbs supported by REST (Representational state transfer) to manipulate data.

GetAsync() will return a HttpResponseMessage, which contains the returned status code, response headers and returned content, which can be read in a variety of ways.

Parsing JSON

I have rarely used native framework JSON classes (I prefer using JSON.Net), but looking at the new API it looks like there’s quite a few changes here as well.

A returned string can be fed to the JsonObject in its constructor or using Parse() method on its instance. Either way will result in an exception if the JSON string is invalid and couldn’t be parsed.

Once parsed, you’ve got full access to it’s structure. Before I show the code to access it, let’s look at snippet of the returned JSON string:

{
  "photos":
  {
    "page":1, 
    "pages":1, 
    "perpage":100, 
    "total":"13", 
    "photo":
    [
      {"id":"6146549133", ..., "title":"20 Microsoft interns (three from Olin) at this week's BUILD conference", ...},
      {"id":"6146244616", ..., "title":"Internet Explorer", ...},
      ...
      ...
    ]
  },
  "stat":"ok"
}

And this is how you would read the titles of returned photos:

private static List<string> titles = new List<string>();

public static async void ExaminePhotos()
{
    string responseText = await GetPhotosStream();
    JsonObject root = new JsonObject(responseText);
    bool isSuccess = root.GetNamedString("stat") == "ok";
    JsonObject info = root.GetNamedObject("photos");
    int page = (int)info.GetNamedNumber("page");
    int totalPages = (int)info.GetNamedNumber("pages");
    JsonArray photos = info.GetNamedArray("photo");
    for (uint i = 0; i < photos.Count; i++)
    {
        string title = photos.GetObjectAt(i).GetNamedString("title");
        titles.Add(title);
    }
}

While the “Named*" methods return typed values (GetNamedString() returns a string, GetNamedNumber() a double, etc.), it’s also possible to get the JSON value by string indexer and later call to its typed value, e.g. json[“stat”].GetString(), which gets useful if you want to check for its type first.

The second part deals with a JsonArray named photo, which gets enumerated and read in a similar manner.

Wait, isn’t this supposed to be simpler?

Of course, the DataContractJsonSerializer is still here. In fact, it appears to be the same class, just moved into a separate assembly.

To use it, create appropriate classes from the JSON structure (one of utilities that can help) and deserialize JSON string with the help of DataContractJsonSerializer:

string responseText = await GetPhotosStream();

DataContractJsonSerializer serializer = new DataContractJsonSerializer(typeof(RootObject));
RootObject root;
using (MemoryStream stream = new MemoryStream(Encoding.Unicode.GetBytes(responseText)))
{
    root = serializer.ReadObject(stream) as RootObject;
}

The result is a full object tree that was deserialized from the flickr API JSON string.