Andrej Tozon's blog

In the Attic

NAVIGATION - SEARCH

Adventures in Calculus, pt. 2: A Letter to Santa

In previous adventure, we built a simple calculator with some help of DataTables and data binding. Today, with holidays right behind the corner, we'll write a letter to Santa, using the same tools.

DataTable's expressions can include other columns' values and they are not limited to numeric values - they have much power in text operations too. For this example, we'll build a simple tool to transform raw input data to a nice letter to Santa.

Again, we'll create our base calculation class and call it SantaTemplateCalculator. In it's constructor, we'll create a DataTable like in a previous example, with some extra columns, which will represent the data we're going to input:

table.Columns.Add("Name", typeof(string));
table.Columns.Add("Gender", typeof(string));
table.Columns.Add("Behavior", typeof(string));
table.Columns.Add("List", typeof(string));

We'll also expose this fields as properties:

[Bindable(true)]
public string Name
{
    get { return (string)row["Name"]; }
    set { row["Name"] = value; }
}

...

Then we'll build a three-part form:

The left-hand side part contains input fields, which we'll bind to our SantaTemplateCalculator class' properties. The middle part serves as a template and is bound to Expression property of our output column. And the value of this output column is shown as a finished letter in the right-hand side label.

Here's a few lines of code to databind our input fields to the SantaTemplateCalculator class:

name.DataBindings.Add("Text", calculator, "Name", true, DataSourceUpdateMode.OnPropertyChanged);
gender.DataBindings.Add("Text", calculator, "Gender", true, DataSourceUpdateMode.OnPropertyChanged);
behavior.DataBindings.Add("Text", calculator, "Behavior", true, DataSourceUpdateMode.OnPropertyChanged);
list.DataBindings.Add("Text", calculator, "List", true, DataSourceUpdateMode.OnPropertyChanged);

If you take a closer look at the template, you'll see nothing but basic string concatenation and references to some variables - these are the names of DataColumns we added to the DataTable.

DataTable's expressions also support some other functions and operators, like the Iif operator, which returns a value based on some simple expression. In the above example the expressions "short list" or "long list" are generated based on how many letters we enter in the List text box.

Our Santa letter generator is now finished. Again - DataTable's expressions, combined with Data Binding options offer a lot of options for developer to automate some simple number or text processing, without writing a lot of code. Expressions are not to be mistaken for SQL Server's computed column - they offer similar (and more limited) functionality, but they are performed on the client, which is a big plus.

Download the source code

To write your letter to Santa right now (it's not too late, you know), launch this tool through this ClickOnce Page and select "Letter to Santa".

Adventures in Calculus, pt. 1

Evaluating simple mathematical expressions in .NET may not appear as an easy task. I mean, how would you code something like Eval("1+1")? While there are more complex solutions to such problem, like using JScript's Eval.JScriptEvaluate(), you can also hook up the DataTable class and its Expression columns to perform some simple calculations.

For this post's example, I created a simple Calculator C# project, which allows a user to enter a simple math expression and watch the result being calculated while typing. There were very few lines of code required to code this sample, since most of the hard work is done by DataTable and Data Binding functionality.

Calculator

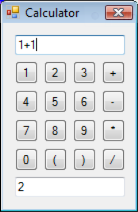
The expression can be entered by typing directly into the box or by pressing desired buttons. Each button's Click event is wired to the same button_Click handler, which additionally reduces the code line count:

private void button_Pressed(object sender, EventArgs e)
{
    display.AppendText(((Button)sender).Text);
}

The core of this project is the Calculator class, which holds the DataTable and actually performs the calculations. A DataTable with single column and single row, holding the default value (0), is generated in its constructor:

public Calculator()
{
    DataTable table = new DataTable();
    column = table.Columns.Add("Result", typeof(decimal));
    row = table.Rows.Add(new object[] { 0m });
}

Calculator class exposes two properties; one for expression, and one for the result. Expression property controls the Expression property of DataTable's only column, and Result only returns the value, being calculated by the DataTable:

[Bindable(true, BindingDirection.OneWay)]
public decimal Result
{
    get { return row.IsNull(0) ? 0 : (decimal)row[0]; }
}

[Bindable(true)]
public string Expression
{
    get { return column.Expression; }
    set { column.Expression = value; }
}

There you go, this is your math calculator engine. And when is the actual calculation performed, you ask? Well, that's the magic DataTable provides for you. By setting the DataColumn's Expression property to a (valid) expression, the value in this column will be automatically calculated by the Framework. 

To finalize this example, let's connect our input and result fields with the Calculator class. Two lines of Data Binding code are required:

display.DataBindings.Add("Text", calculator, "Expression", true, DataSourceUpdateMode.OnPropertyChanged);
result.DataBindings.Add("Text", calculator, "Result", true, DataSourceUpdateMode.Never);

display is a TextBox, used by user to enter the expression, which is passed to the Calculator class through Data Binding. Similarly, result TextBox will display whatever comes from the same class.

Well, that was easy, and you've now got yourself a fully functional calculator. In further posts, we'll explore additional calculation options DataTable provides.

Download this sample

[Update: you can try the compiled Calculator sample without downloading and compiling the code. Just run it through this ClickOnce page]

Latest hotfixes for Visual Studio developers

Microsoft launched a "DevDiv Hotfix Public Availability Pilot Program", which will allow developers to access and download some of the latest hotfixes of their developer tools. Not many hotfixes are available at this time [the one that caught my eye was "FIX: You may receive an error message when you rebuild a solution and try to view a Windows Form in Design view in Visual Studio 2005."], but hopefully the number will increase in time. Of course, this hotfixes will be included in the forthcoming Visual Studio 2005 Service Pack 1.

This program is available through Microsoft Connect. And make sure you read the red text before downloading and applying any of the hotfixes...

Visual Basic 2005 Power Packs

If you're a VB6 developer, who is just about to migrate to the new, VB 2005 (.NET 2.0) environment, you'll probably going to miss some of the old tools and features you loved to use in good old VB6. To ease up the migration process for you, Microsoft just launched a new site, dedicated to VB 2005 Power Packs, which fill feature downloadable (free) "Add-Ins, Controls, Components, and Tools for you to use with Visual Basic 2005 to make developing great applications even easier".

Currently, there are two packs already available to download: Microsoft Interop Forms Toolkit will allow you to easily extend your VB6 applications with new WinForms controls by generating all necessary COM wrappers around those controls with a simple click of a button, which in the end allows you the slow, step by step migration to the new environment.[Update: see this blog post for a 6-minute screencast on this toolkit.] The second pack, Microsoft PrintForm Component, simply brings back the feature of printing your application's forms (including print previews).

You can check for other packs in the making on the Power Pack Suggestion Center (on Microsoft Connect), where you can also vote for your favorite packs and make suggestions for a new pack you'd want to see and use in the future. There's at least one pack already in the making, which I'm sure you already miss - The Line and Shape Controls.

Windows Forms controls - controlling the z-order

Talking to other developers and hanging around newsgroups and forums I noticed quite a few people have problems arranging controls on a windows form in design time. A typical problem is the overlapping of docked controls. For example, put a Panel and a MenuStrip on a blank form (in that exact order) and set Panel's Dock property to Fill [MenuStrip should already be docked to top]. This results in Panel's top area being hidden behind the MenuStrip:


Why's that? The way how controls on a form are docked is determined by the z-order [how controls are layered along the form's Z-axis - depth]. The control's z-order is determined by its position in container's Controls collection, with the first control in the collection being at the front (top layer) and the last at the back.

Thus, in the previous example, the form's Controls collection order is: [0: MenuStrip, 1: Panel], and since higher-layered controls can overlap those behind them, the Panel, having Dock set to Fill, can take all the space it needs, without MenuStrip blocking its way.

Now, as you've already guessed, we need to change control's z-order to make things look right. If Panel was put in front of MenuStrip, MenuStrip would still be visible (it's docked to Top) and Panel would only occupy the remaining of form's space.

To fix this at design time, we have a few options:

  • Right-click on the Panel and select "Bring to Front". This will change Panel's position in form's Controls collection to 0, making it the top of z-order. Similarly, you could right-click on MenuStrip and choose "Send to Back".
  • Select the Panel and choose "Format | Order | Bring to Front" from Visual Studio's menu. There are also two icons on the Layout toolbar that do the same thing.

  • Visual Studio 2005 also includes a very useful tool window called Document Outline (menu: View | Other Windows | Document Outline, shortcut: Ctrl+Alt+T), allowing you to rearrange controls by simple drag and drop operations, moving it among different containers and changing their z-order:

At run time, when adding controls dynamically, you can change control's z-order programmatically: every control, derived from Control class, has BringToFront() and SendToBack() methods:

Panel panel = new Panel();
Controls.Add(panel);
panel.BringToFront();

There's many ways you can control the layout of your forms and controls, changing z-order is just one of them. Setting your controls' margins, padding, anchoring and docking properties properly will help you create powerful layouts, which will automatically adjust to various screen resolutions and form's sizes, without the need of additional coding for adapting user controls when user resizes the form.

[Update: images above were copied directly to WLW and published using FTP Image publishing feature. Issues encountered were image blurring - see above - and numerous errors/republish attempts to upload all images successfully. Also, pictures were "taken" on Windows Vista July CTP]